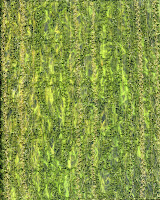
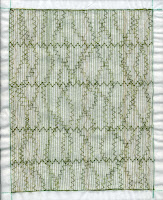
 I was in serious need of some brainless sewing the other day, and decided to add some physical texture to a photo of moss that I took at Nisene Marks State Park. I've played with this technique before (lots of machine stitching on wash-away stabilizer) and wanted to see how it would work when superimposed on a digital photo. I'm sure it looks like a mess in such a small image, but I'm mostly really pleased with the way the stitching turned out.
I started with two layers of Aqua-Magic pinned together. I prefer this stabilizer because it feels more like fabric than the see-through types, and it doesn't stick to the bed of my sewing machine. Two layers is a compromise--not too much to wash away, while not distorting too much when densely stitched.
Good thing I was in the mood for brainless stitching, because creating the underlying grid is a bit tedious! The first pass outlined an 8" x 10" rectangle in straight stitch (1.8 on my Bernina), then parallel vertical rows approximately 1/8" apart. I used a toning color of Masterpiece thread top and bottom. Masterpiece is finer than standard sewing thread so the grid lines almost vanish into the picture.
The moss is mostly a bright spring green, but there are drab khaki sections as well. I changed thread colors (still Masterpiece) and added more gridlines. To hold everything together later on, I used a mock-smocking zigzag to stitch horizontal rows every 1.5" or so. I like the zigzag rather than a straight stitch because the horizontal lines aren't as obvious.
 Next: serpentine lines of straight stitches (good old stitch #4 on the Bernina) and curved lines of multi-step zigzag. The curved lines help hold the longer stitches in place. Then I finally got to the real point of the exercise: lines of feather stitch for texture. To finish, place the wash-away on top of the photo, stitch in place with a fairly dense applique stitch and wash the stabilizer away.
As a proof of concept, it did exactly what I wanted. I would do things differently next time around, though. It is important to secure the grid to something stable/sturdy, so I printed the image on TAP (Transfer Artist Paper) fused to heavy-weight Lutradur. Even though the Lutradur held the thread web securely, I don't like the photo quality of the transfer. Next time I will print the photo directly on fabric (EQ Printables) and come up with a new way of holding the stitching securely. I used Highlights (40-wt. polyester) for some of the feather stitching with either Masterpiece or Bottom Line in the bobbin. Masterpiece was very well-behaved but I had a heck of a time getting the tension right with Bottom Line. I would also avoid straight-line stitching with high-contrast threads, they just show up too much.
This project was a fun way to spend an afternoon, and probably took almost as long to write up as it did to do most of the stitching! I can't wait to incorporate this technique into my "Walk in the Park" quilt.
No comments:
Post a Comment