Friday, June 25, 2010

Feathered Stars

I am an absolute zombie after my agility workshop today -- I didn't think I ran around that much, but I've taken over 14,400 steps already today. I'm going to kick off my shoes and sit back with this new book. I love feathered stars and these grid-based stars should go together easier than traditional Le Moyne-based stars.

Have a great weekend!

Thursday, June 24, 2010

Happy Day!


It is warm and mostly sunny today and I've been painting fabric. This is the first time I've messed with monoprinting -- what fun! I love the serendipity of the way the paint moves around and blends unpredictably, but the texture where the bubble wrap lifted the paint is still visible. I do a little happy dance when I pull the fabric to see what the result is...

I'm also printing the notes for my agility workshop tomorrow. We've got a long way to go to be ready to compete, but I'm not quite as clumsy on the course, and the boys generally understand what my flailing arms mean. Fingers crossed I don't fall down or run into anything on my runs tomorrow!

Monday, June 21, 2010

Kaffe & Friends Go to Bali


I don't remember showing you this quilt -- I finished the binding while I was down in CA and just got the label done tonight. It is one of the "Simply Charming" scrap projects I am teaching in July for Quilters Affair. Everything came out of my stash (although several of the pieces were fat quarters). My friend Tammy quilted it with an all-over floral design that adds a bit of texture but doesn't compete with all that pattern.

The pre-teaching crunch is on. I've got one wall quilt to bind plus a couple of journal size samples to finish up. I'd like to paint and stamp more fabric for my surface design class, add some embellishments here and there, plus I've got to look over my handouts... Which reminds me of a lyric from an old country-western song: "Work your fingers to the bone, whadya get? Bony fingers!" I already had those, so a bony butt would be nice!

Saturday, June 19, 2010

Success at Last!

I'm sure this is a sign of my Virgo-ness, but I have spent tons of time tagging all my images in Photoshop Elements. If I'm looking for a bird or a brush (or a bird brush!), one click brings up just the subset I'm interested in. I lost all the tags when I upgraded to Windows 7 and couldn't get my backup to restore correctly, so I've been obsessed about getting a copy on my laptop just in case. I got it to work today -- hooray, sigh of relief! It is a bit time-consuming, but definitely preferable to recreating all the tags.

I am still slogging away at binding on my scrappy sofa quilt for my class in two weeks, but binding is boring so here is a picture of my darling Yoda working on a chewie.

I used a photo mask meant to look like a Polaroid transfer for this one. I hadn't done a lot with photo masks until yesterday but they are pretty cool. I have two kinds to choose from -- brushes and png files. They are both magical in the way they transform a photo, but the png files may be a little more useful because they blend a photo in to an existing background better.
  • Brush -- Add a solid black fill layer on top of the photo, then stamp with the photo mask brush in white "ink" to expose the photo below.
  • png -- Drag the mask onto the working file, then drag the photo on top of the mask, making sure to cover the completely. With the photo layer active, CTRL-G to "glue" the layers together. The photo will appear in the mask and any "hangovers" will be cropped off.
Now you know what I know...

Thursday, June 17, 2010

SUN!!!


The sun is out! It is still cool (53F/12C) and won't warm up much, but I can deal with that. Sun Sun Sun Sun SUN! (my, have we had a bit of caffeine already today???)

Just for fun I whipped up a quick collage -- I love this 3" size. It didn't start out being "beach-y", but when I opened the faux fish postage from ARTchix, this particular fish demanded to be used since today is the 17th. I found the old letter background on Flickr and it is one of my favorites already.

Besides the sea shell and feather brushes, I used a texture brush from Crumble. Crackle. Burn. by Von Glitschka (click on the photo to see it full size). The book contains 120 textures on DVD in tif, psd and abr formats. I'm normally not fond of ratty/rusty/decaying stuff, but I LOVE these. I added crackles at low opacity on top of the background to grunge things up a bit more -- layers and brushes and blending modes, oh, my!

I wish the rest of you a glad day as well!

Wednesday, June 16, 2010

Return Visitor

It is damp and dreary out and I want sun! I woke up with my "crabby pants" on today, and they were still there, even after a workout and TWO chocolate chip cookies. That will never do, so I thought I would introduce you to a little friend who is back again this year.

Mama Bird is back for her third year and her second in this spot (yes, I know it could be a different bird, but what are the odds she would nest by the front door again?). Her nest is a couple of feet from the doorbell, and she sits tight even when visitors come to the door. The next time someone asks if we know we have a bird nest there, I will have to pretend I've never seen her before!

I used my longest lens to give her as much space as possible. I should have checked the vibration reduction setting before I went out -- it was hard to hold things steady after two cups of tea and two cookies!

So, let's balance on our left legs and sing a silly song: Crabby pants -- OFF! Glad clothes -- ON!

Sunday, June 13, 2010

Over the River and Through the Woods

Anyone who has seen my library knows that I do my best to keep the publishers of quilting, embroidery and beading books in business. Every once in a while I buy something that Amazon recommends, even if it isn't directly related to those topics, and this is one of those books. I skimmed through this one when it came but didn't really read it until recently.

One of the first manipulations in the book uses sandpaper or an awl to scratch up a lab-processed photograph; another takes it a step further by placing a texture/rubbing plate under the photo and scratching away. Scratching "real" photos reveals a yellow layer under the emulsion. I love the idea and wondered if I could do the same thing in Photoshop Elements.

I created a new file with a mustard yellow background. Added a layer and stamped some swirls (aligned so I knew where they would be). Dragged a photo onto a new layer and started erasing the photo away over the swirls. "Digital Art Revolution" by Scott Ligon suggested using a drawing tablet and hard brush to simulate a paintbrush, so I dug out my stylus and gave it a try. I'm not a doodler and didn't like the hard scribbles, so I backed out the changes and tried again with a larger (100px) soft-edged "brush" in eraser mode set at 46% opacity. A single click or stroke isn't as dramatic this way, and I like soft edges in the example below.

The swirls have nothing to do with the bridge except they were quick and easy to stamp, but I can see a lot of potential for this technique with logically related images. I know I could do the same thing by masking off part of the image instead, but this appeals to me since I was replicating a physical manipulation. Cheers!

Saturday, June 12, 2010

Playing with Texture

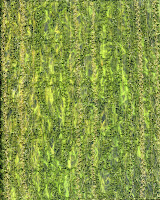
I was in serious need of some brainless sewing the other day, and decided to add some physical texture to a photo of moss that I took at Nisene Marks State Park. I've played with this technique before (lots of machine stitching on wash-away stabilizer) and wanted to see how it would work when superimposed on a digital photo. I'm sure it looks like a mess in such a small image, but I'm mostly really pleased with the way the stitching turned out.

I started with two layers of Aqua-Magic pinned together. I prefer this stabilizer because it feels more like fabric than the see-through types, and it doesn't stick to the bed of my sewing machine. Two layers is a compromise--not too much to wash away, while not distorting too much when densely stitched.

Good thing I was in the mood for brainless stitching, because creating the underlying grid is a bit tedious! The first pass outlined an 8" x 10" rectangle in straight stitch (1.8 on my Bernina), then parallel vertical rows approximately 1/8" apart. I used a toning color of Masterpiece thread top and bottom. Masterpiece is finer than standard sewing thread so the grid lines almost vanish into the picture.

The moss is mostly a bright spring green, but there are drab khaki sections as well. I changed thread colors (still Masterpiece) and added more gridlines. To hold everything together later on, I used a mock-smocking zigzag to stitch horizontal rows every 1.5" or so. I like the zigzag rather than a straight stitch because the horizontal lines aren't as obvious.Next: serpentine lines of straight stitches (good old stitch #4 on the Bernina) and curved lines of multi-step zigzag. The curved lines help hold the longer stitches in place. Then I finally got to the real point of the exercise: lines of feather stitch for texture. To finish, place the wash-away on top of the photo, stitch in place with a fairly dense applique stitch and wash the stabilizer away.

As a proof of concept, it did exactly what I wanted. I would do things differently next time around, though. It is important to secure the grid to something stable/sturdy, so I printed the image on TAP (Transfer Artist Paper) fused to heavy-weight Lutradur. Even though the Lutradur held the thread web securely, I don't like the photo quality of the transfer. Next time I will print the photo directly on fabric (EQ Printables) and come up with a new way of holding the stitching securely. I used Highlights (40-wt. polyester) for some of the feather stitching with either Masterpiece or Bottom Line in the bobbin. Masterpiece was very well-behaved but I had a heck of a time getting the tension right with Bottom Line. I would also avoid straight-line stitching with high-contrast threads, they just show up too much.

This project was a fun way to spend an afternoon, and probably took almost as long to write up as it did to do most of the stitching! I can't wait to incorporate this technique into my "Walk in the Park" quilt.

Monday, June 7, 2010

Getting a Little Crazy...

Since I have all the time in the world (HA!), I signed up for Sharon Bogon's "Encrusted Crazy Quilting" class through Joggles.com. My block is 12" since I wanted space for some larger motifs -- that medium green solid in the top left is begging for something over the top... I'll post photos of the embroidery as I get it done.

Sunday, June 6, 2010

Quilts Make Comfy Beds

I'm still working on getting everything organized after my trip, but this quilt won't be moving for a little while! Cupcake says it makes a very nice bed (oh, and "put the camera away!"). Kitties have needed so much love since I got back, which meant I didn't sleep much last night. The dogs have gotten a couple of time-outs for chasing kitties...

Saturday, June 5, 2010

Long Drive...

Ugh, a 9.5 hour drive up from CA today. I need a "butt-ectomy!" The dogs and I are home, safe and sound (although they're driving me bonkers arguing over a toy...). We took a nice walk at the arboretum in Redding, but melted in the heat and humidity. It won't be that warm here in Central Oregon for at least another month, so I was a wee bit crabby by the time we were done. I would never survive in a tropical climate!

I finished the binding on two quilts while I was down in CA and started work on another. Of course I took enough books and hand work to last two months! Taking care of Mom and keeping the dogs entertained took more time than I expected, but it was a nice break. Now I'm back to work on UFOs and a crazy quilt. Pictures soon!

Tuesday, June 1, 2010

Photo Safari

Nancy and I took our cameras to Nisene Marks State Park today. I fed the mosquitoes but think I avoided the poison oak (thanks, Nancy!!!). Most of the area was in deep shadow but we found this newly-opened leaf and took multiple photos each. I got quite a few good texture shots and look forward to tweaking them in Photoshop.